
Archaeologist Working on a Dig
Planning:

Equipment used:
Methods of Dating & Classifying Artefacts:
Sorting Table:
Transportation & Display of Artefacts:
*Rescue Archaeology:
*Underwater Archaeology:
Choosing a Site
An archaeologist chooses a site to begin an excavation after evidence is found that there may be historical artefacts located in that place. The archaeologist will consult with any existing primary & secondary sources to estimate the exact location and type of excavation that is necessary. Examples of existing evidence would be settlement ruins that have been unearthed, or tools, jewellery and/or weapons that have been recently found there. The size & location of a dig varies, as artefacts can vary from ‘accidental locations’ such as broken pots, coins, tools and weapons to ‘deliberate sites’ such as settlements, tombs & burial sites.
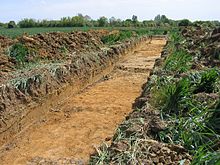
Beginning the Dig
Having completed all the pre-dig research, using primary & secondary sources and consulting with historians, the archaeologist will then map out the perimeter of the dig site. This is done with either a line (narrow rope or string with small poles) or metal grid. The dig beings with a shallow excavation while the archaeologist sketches and photographs the dig as it progresses down into the soil, taking photographs of the layers of opened soil. He will use a measuring pole to identify the depth of the dig and each artefact as it is found.
Tools & Methods
As the dig progresses, the archaeologist will use finer tools so as not to damage any artefacts in the soil. These tools include small trowels, for opening up the soil carefully & a sieve, for separating any small artefacts or pieces of artefacts from the soil. Any artefact or unidentified object will then be placed on a ‘sorting table’ where the relationship between different artefacts can be later established.
Further Tools & Methods
Once a significant find has been established, the archaeologist will then use a grid, which can be used to ‘plot’ on a sketch (or photo) of the location of different artefacts on the same strata level in a dig. This can be particularly useful if artefacts are small, broken or unusual. Using the grid, the relationship between these artefacts can later be established accurately. Stratigraphy is especially useful; as the level of soil in which the artefact is found gives a good estimate as to the age of the artefact. Carbon-14 Dating is used when any human remains are found; the less carbon found in the bone fragments, the older the remains (radiocarbon test). Finally, Dendrochronology is used to date wooden artefacts; a cross section of the wood in the artefact reveals the number of rings, therefore the age. (Also, examining the spacing of rings in a cross section of wood can tell an archaeologist a lot about the weather at that time.)
Cleaning, Identifying & Collating Artefacts
Record-Keeping is essential throughout an excavation. When artefacts are found, sketched and photographed, they are brought to a ‘sorting table’ where they are cleaned and identified. Here, archaeologists can attempt to re-assemble broken artefacts, study their significance or relate them to other artefacts and remains found at the site. For example, King Tut’s tomb in Egypt contained many of the King’s possessions; therefore by examining what was found in his tomb can help both archaeologists and historians to understand the value-system and beliefs of his culture.
Other Methods & Spoil Heap
Even as a dig progresses, the soil removed from a site is all placed in one location. This is known as the ‘spoil heap’ where archaeologists can check again to see if any very small pieces or artefacts can be found. The dig itself takes a very long time and progresses very slowly. Great care is taken with all aspects of digging and excavating so as to ensure that any artefacts are not damaged or crushed by boots, larger tools etc.
Pottery
Pottery is one of the most commonly-found artefacts in an excavation. Even though pottery is easy to break, it does not decay in the soil. Pottery can tell archaeologists and historians a lot about the time and culture it came from such as those found throughout the Mediterranean depicting scenes from Ancient Greece and Rome. Magnetic Dating is used to identify the general time period of any clay artefacts found in the soil. When clay is baked to produce pottery, an imprint of the earth’s magnetic field is imprinted in the pot. By studying the imprint, scientists can determine the relative age of the artefacts by comparing it with known previous locations of the Earth’s magnetic field.
Transporting, Preserving & Display of Artefacts
Once a dig has been completed and all artefacts cleaned and collated, they are moved very carefully in specific ways to museums and laboratories for further study and testing. For underwater archaeology, artefacts are preserved in special salt-water tanks to prevent the air from accelerating their decay and decomposition. Museums often have large displays of organic and inorganic artefacts such as the National Museum of Ireland in Dublin.
| Tools | Dating Methods | ||
|---|---|---|---|
| Trowel Measuring Pole Line & Grid Sieve Sorting Table ‘Spoil Heap’ Camera | Stratigraphy Carbon 14 Dating Dendrochronology Magnetic Dating | ||
| | |||
1: Choosing a Site
2: Beginning the Dig
3: Tools & Methods
4: Further Tools & Methods
5: Cleaning, Identifying & Collating
6: Other Methods & Spoil Heap
7: Pottery
8: Transportation, Preservation & Display